![]()
Acumen User Guides
E-Style Guide
Once the Acumen Smart Document Solution software is installed and you re-open Microsoft Word, the “Acumen” tab will appear in the top ribbon of the Word application which means the software is installed. F

Activation
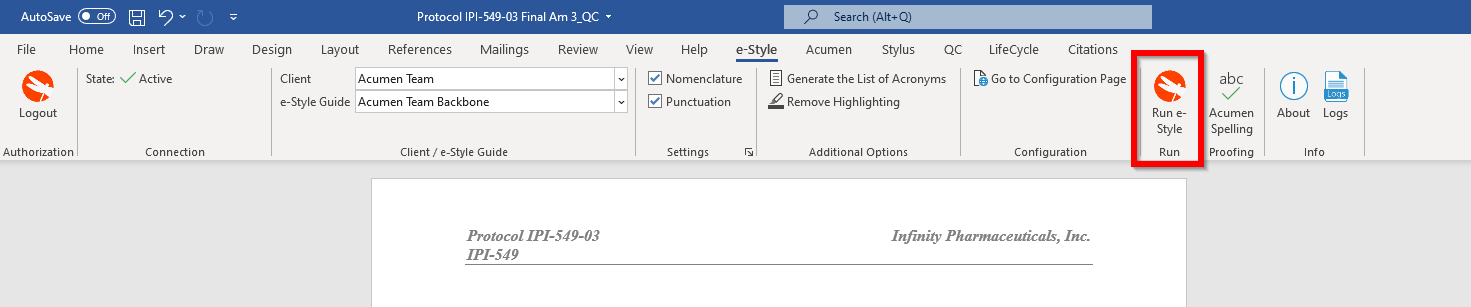
Use of the features of the “e-Style” tab is simple and easy to use.
The default setting for this tool is inactive and the icons and functionality are greyed out and unresponsive. To activate the e-Style Guide select your client organization from the “Client” drop down menu.
This will trigger the Acumen dictionary to be loaded which will enable an enhanced spellcheck feature.

Starting off, The client drop down is where you can select which organization’s e-style guides you’d like to use. Once an organization is selected then The e-Style Guide drop down menu will populate with the available e-Style Guide(s) for your organization. If you have multiple e-Style Guides to choose from, then just select the appropriate version that you wish to use with your document.

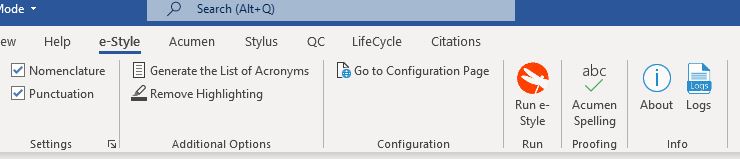
You can also select whether to have nomenclature or punctuation dictionaries included as well via the checkboxes below the e-style guide drop down box. Using the bottom corner arrow of the e-style Guide section will also bring up a list of categories / subcategories that can be enabled / disabled for scanning.

Running Scans
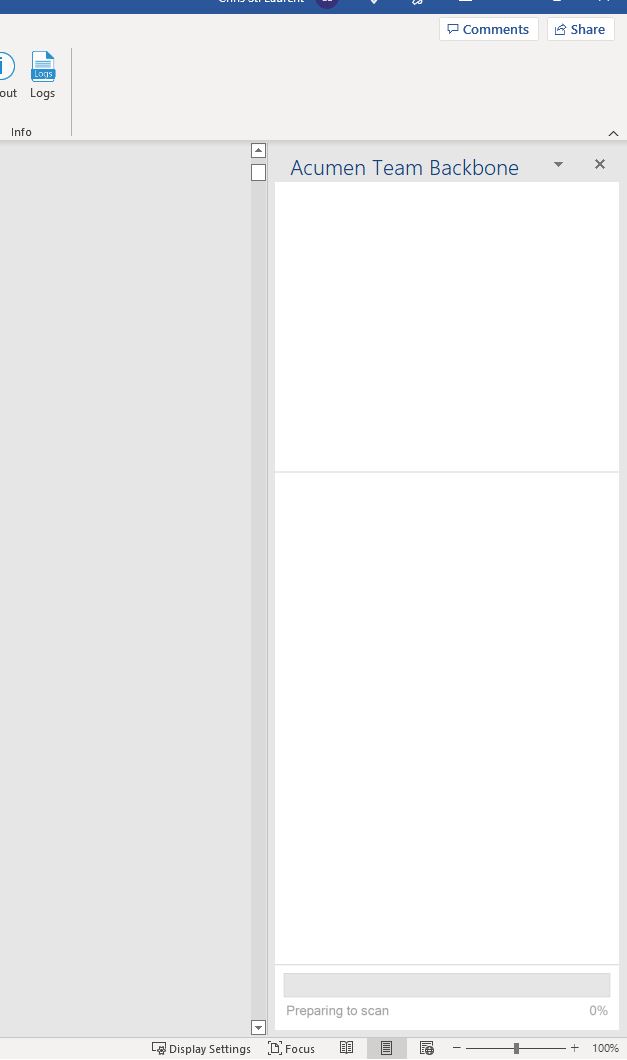
To run the tool, the user simply checks the settings for the categories that they wish to scan and hit the “Run e-Style” icon.
A right-side panel will open in the Word file which will show the progress of the scan.
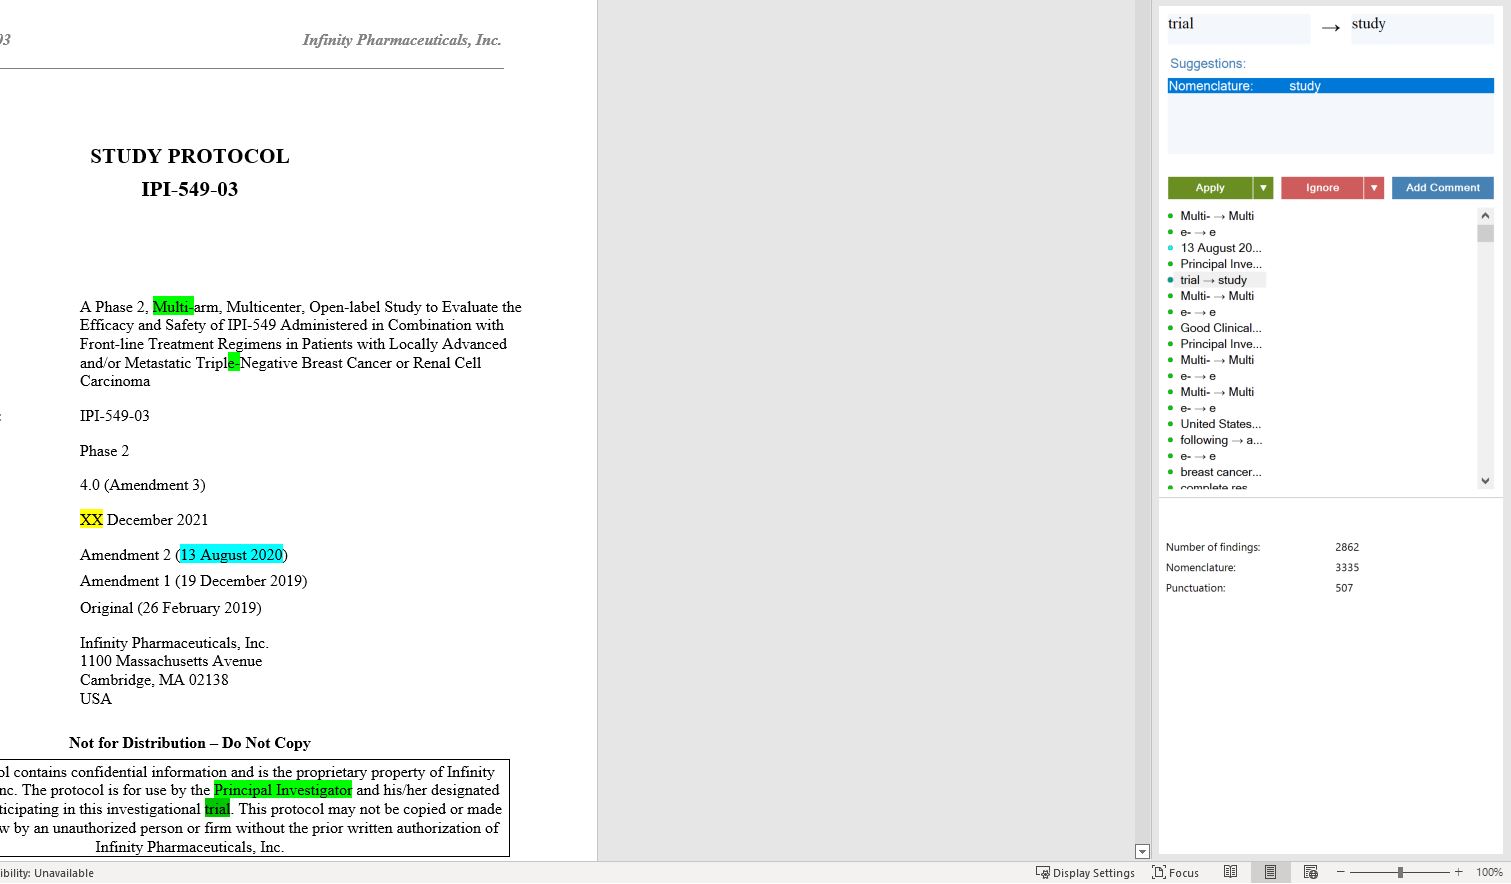
Once the scan is complete, the findings will appear in a list in the same panel and also as highlights in the Word document. The categories appear as color-coded highlights for easy recognition of the type of finding.
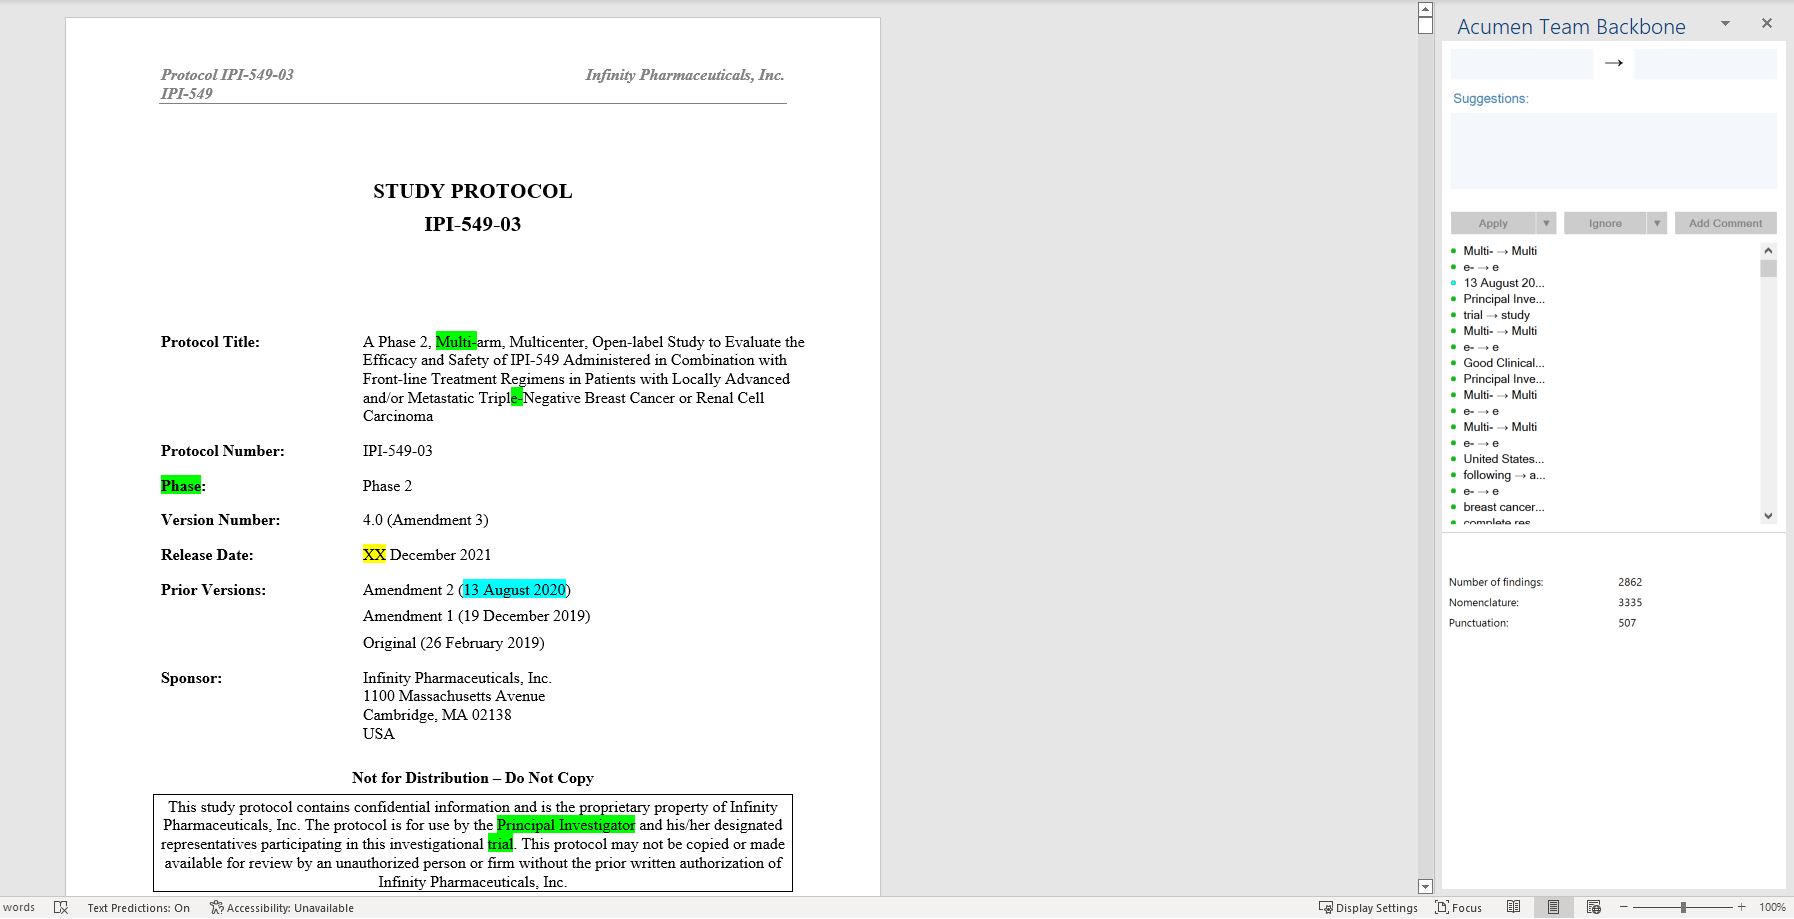
The use can navigate through the findings either through the panel or by clicking on the highlighted finding in the Word file.
Changes are note and replacement text is provided for any finding that the tool flagged. The user can choose to “accept” or “reject” any edit. Also they can “accept all” or “reject all” of a finding that occurs multiple times. The findings are counted down in the bottom portion of the panel as they are resolved. Once the findings have been resolved, the user can remove any remaining highlights in the document and simply close out of the panel.
NOTE: The e-Style Guide can be ran as many times in as many configurations as the user wishes or needs to create a clean and document.
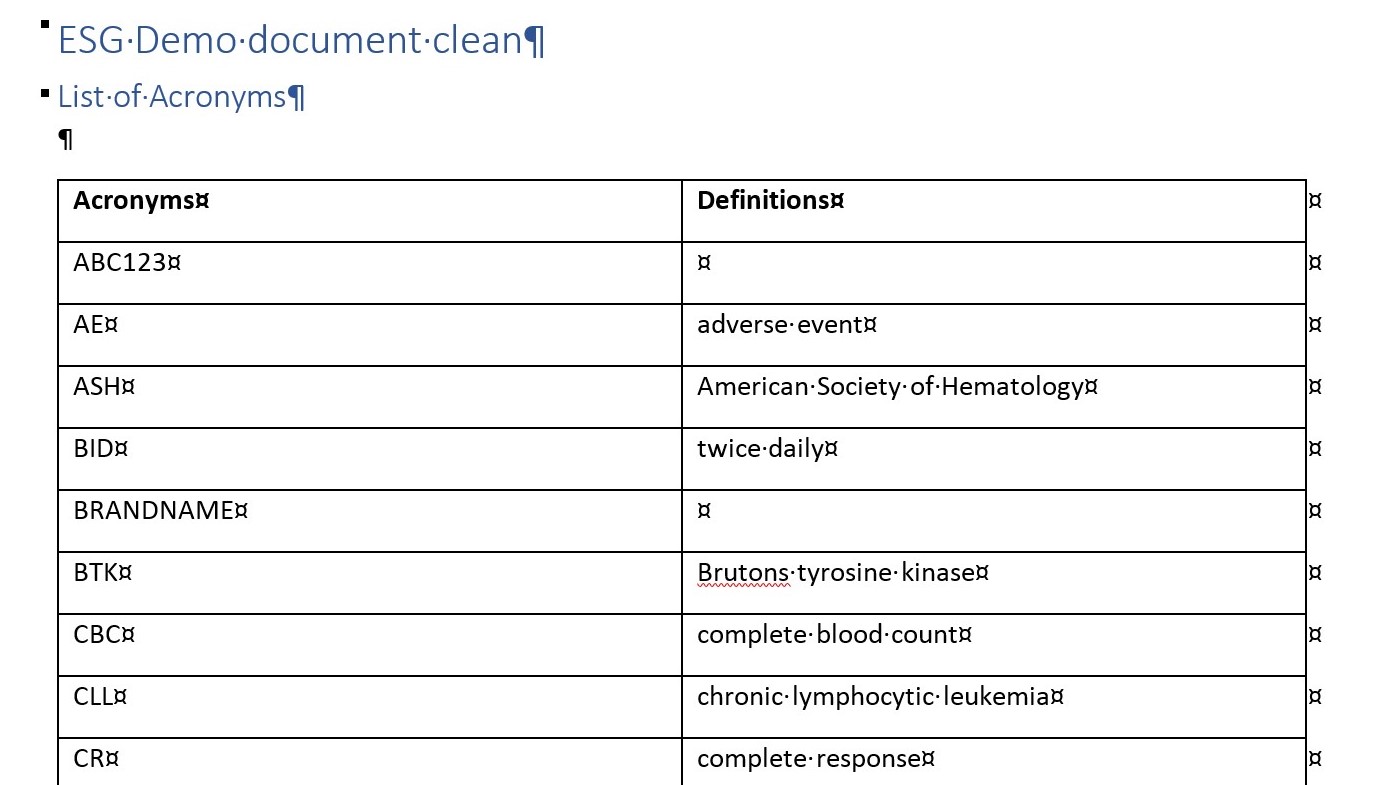
Another feature is the generation of a list of acronyms in a document. Since the e-Style Guide can scan for known or suspected acronyms used in the file, it has a feature where these acronyms can be compiled into a list.

The list of acronyms is compiled and open up as a separate Word file. This file can be used to confirm the terms used, to QC the document, or to include within the document as a list of acronyms if needed.
The output file is a table that shows the acronym found and the definition of the term if it is known to the software backend data. If not known, then the second column is left blank. Acronyms found that appear 3 or fewer times in the document will be highlighted to flag their infrequent use.

Note that the tool identified anything that appears to be an acronym (ie, contain multiple capitalized letters in a row). Some findings may not be valid acronyms.
ESG Configuration
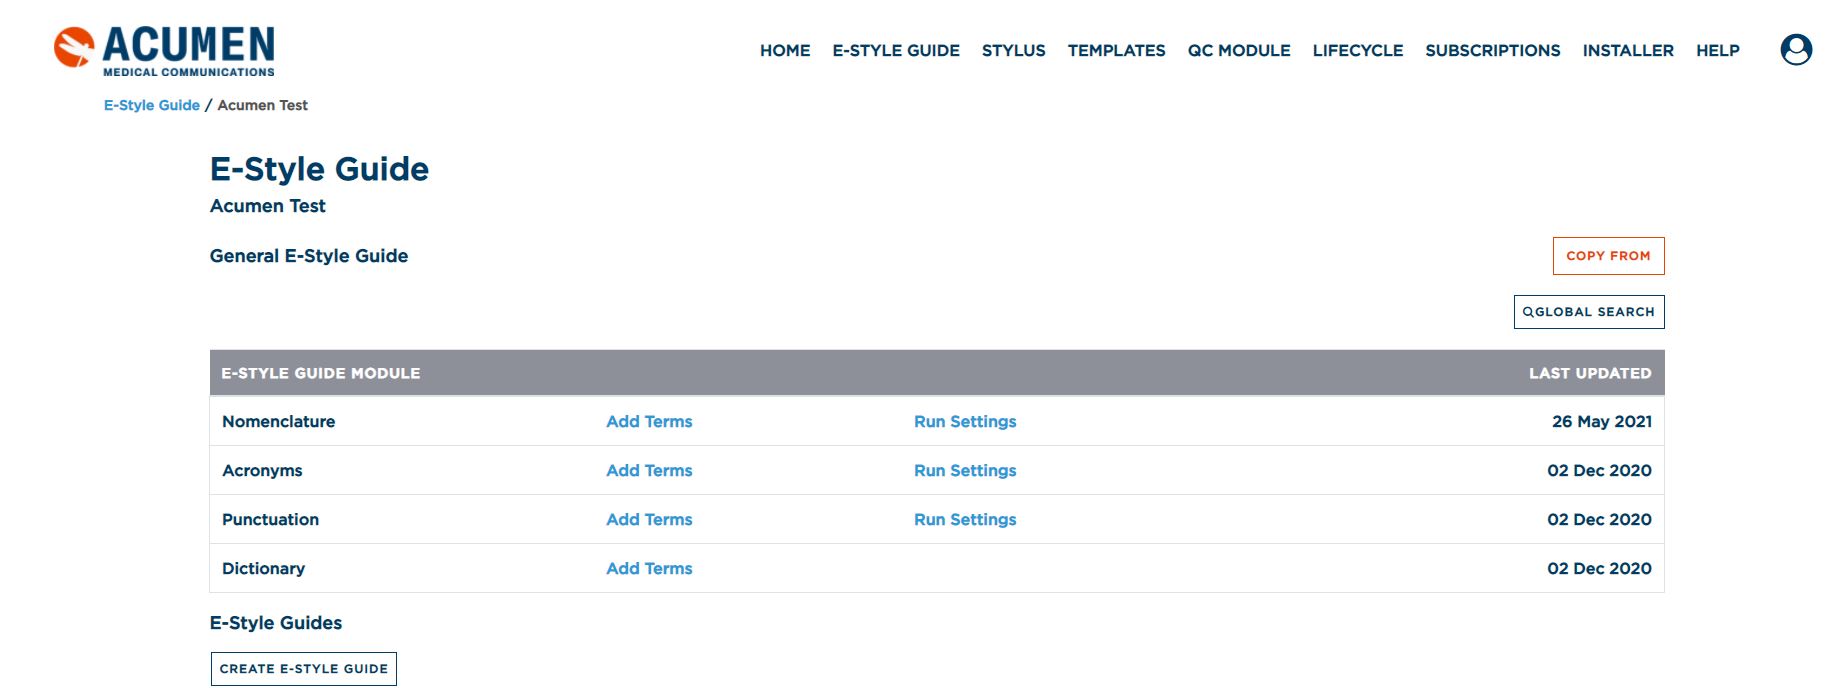
The e-Style Guide can be configured to run “micro-scans” of the document to search for subcategories of the main search settings. Users can access the web interface to make adjustment to the settings by logging into the web portal directly using the credentials provided when the tool was installed. A shortcut to the web portal is available by clicking the “Go to Configuration Page” icon.
Once logged into the page, the user navigates to the e-Style Guide page in the top navigation menu. Here the user has several options, they can:
1. Add terms or rules to the e-Style Guide
2. Edit run settings for the plug-in
3. Create additional e-Style Guides modeled off of the main version active.
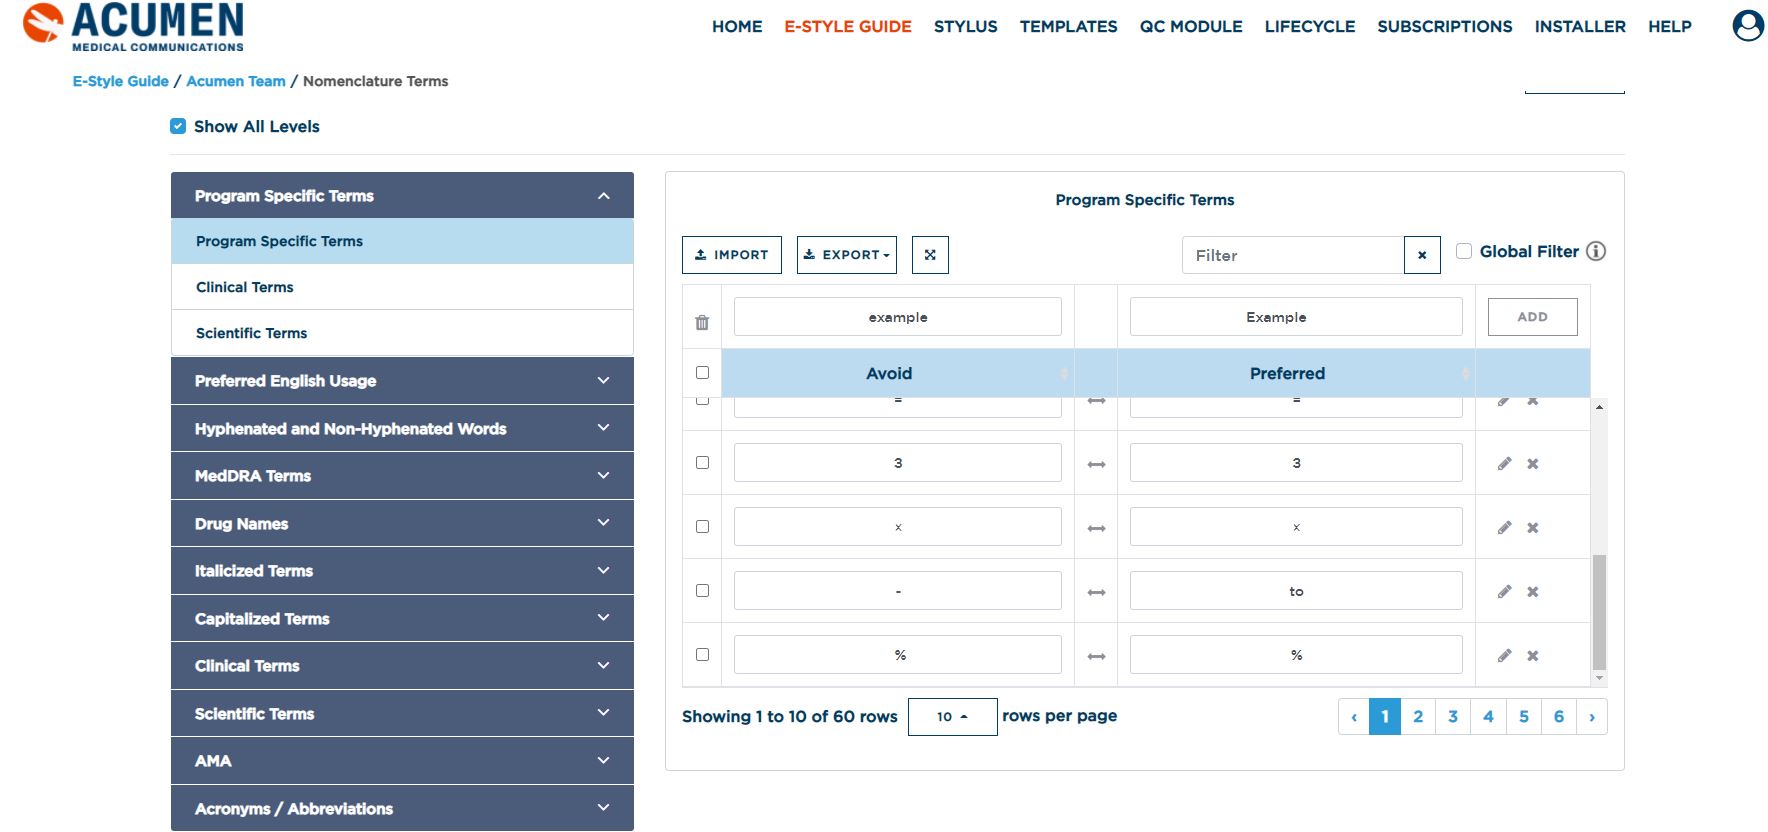
The “Add Terms” link will bring the user to the configurable content portion of the e-Style Guide. This is the data backbone of the tool. The user navigates to the section of choice through a left panel navigation and can scroll pages of any subsection through a bottom page counter.
New items can be added to any subsection by completing each cell for an “Avoid” and “Preferred” term or rule and then clicking “save”. A new row will then be automatically created for further additions. Once saved, the terms will automatically alphabetize.
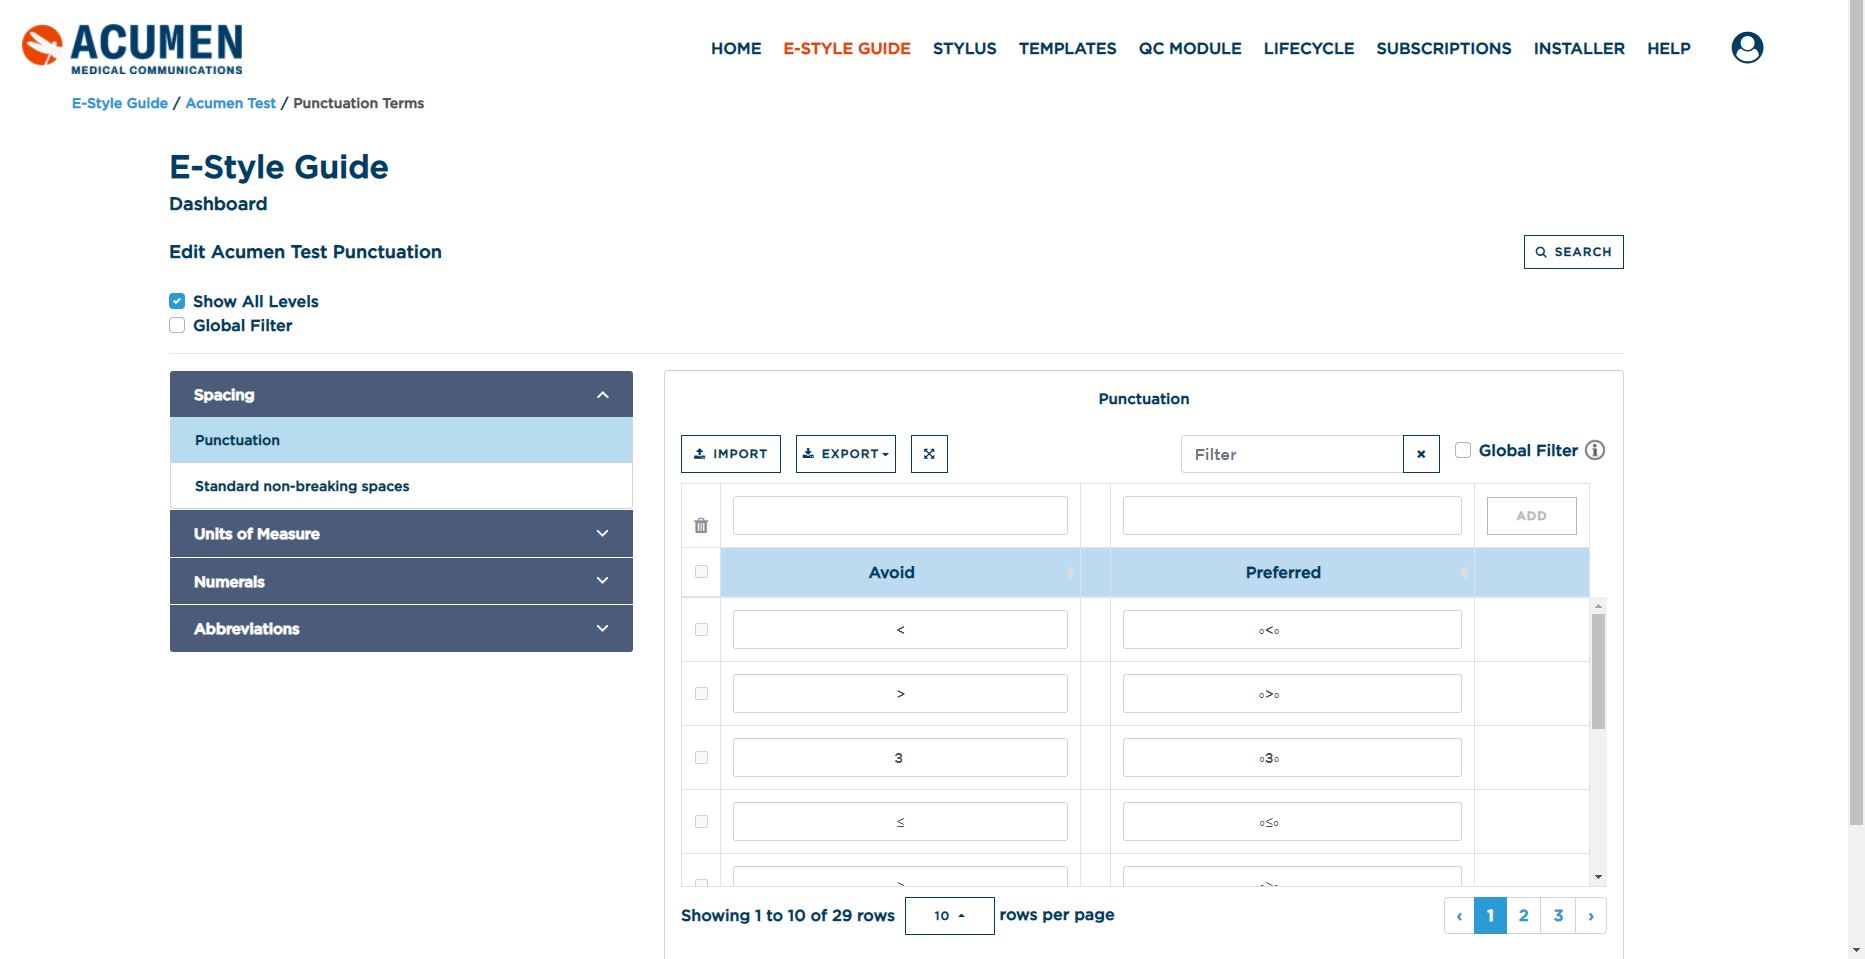
NOTE: Additionally, users can delete unwanted terms/rules (2) or reverse terms as needed (3).
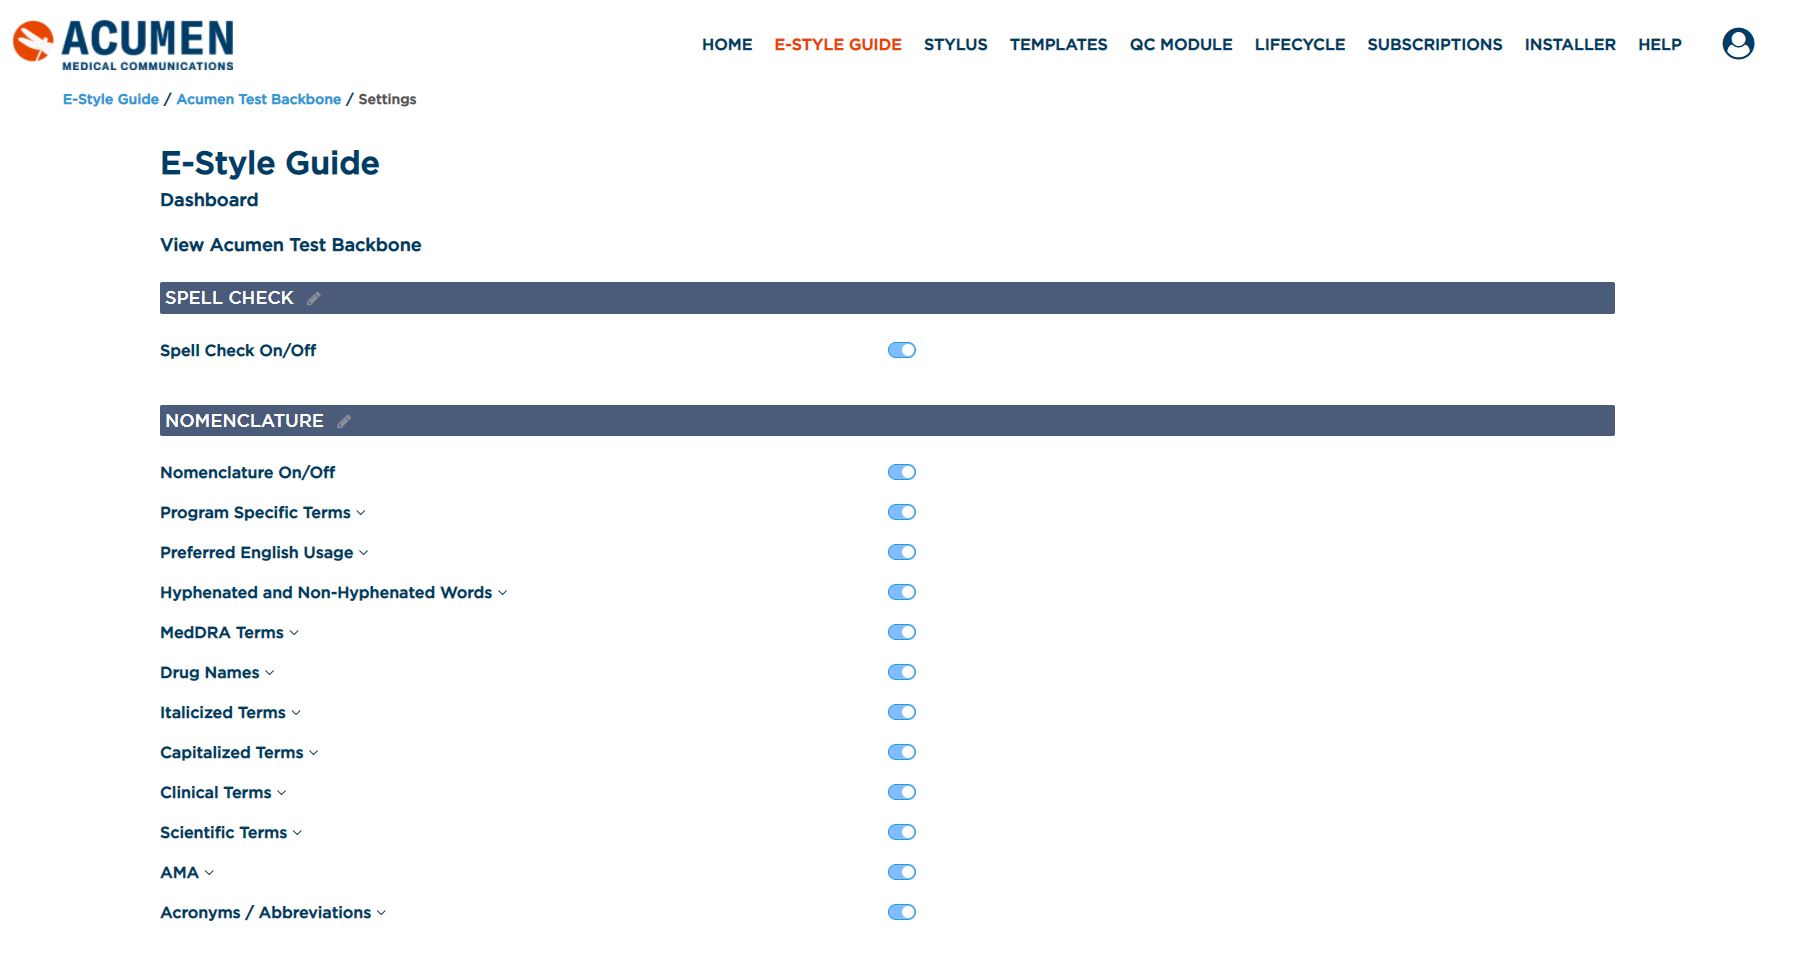
From the main e-Style Guide page, the “Run Settings” link for each of the 3 categories will direct the user to an interface where they can toggle on or off any category or subcategory within the main section. This is helpful to allow the user to run a targeted scan (or “micro-scan”) of the document for just specific style rule that they wish to check. Any combination of search settings is permissible.
By clicking the “Create e-Style Guide” button from the main e-Style Guide page, you will be prompted to provide a name for this new style guide. It will automatically contain the data from the core backbone of information. The user will simply need to add of terms and rules to distinguish this style guide from other that you may have.
This feature is helpful if there are different conventions used between product programs or indication. It allows each sub-style guide to be catered to the specific needs of a program or asset or brand.
Lastly, from the E-Style Guide page you can click on Go to Phrases link to create, edit and view your phrase library(s).
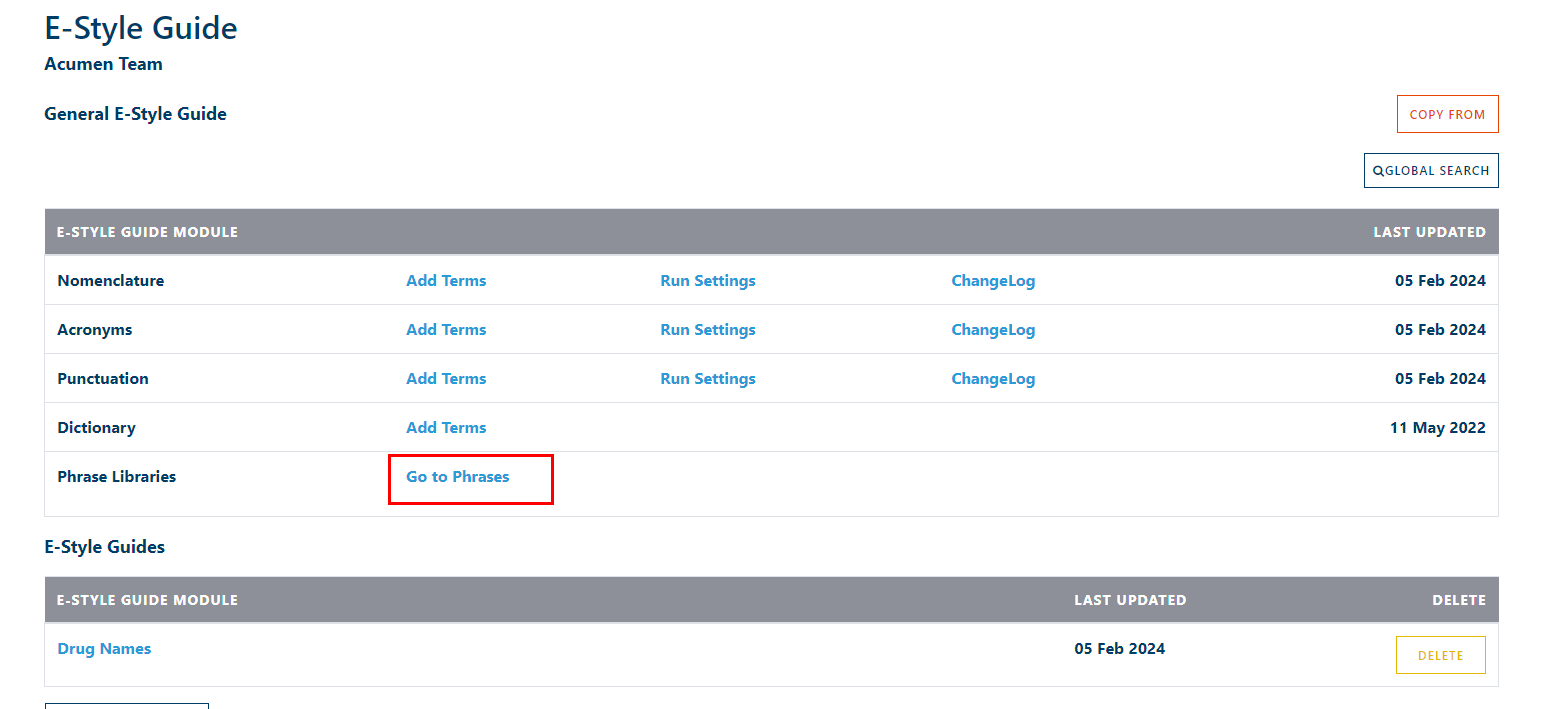
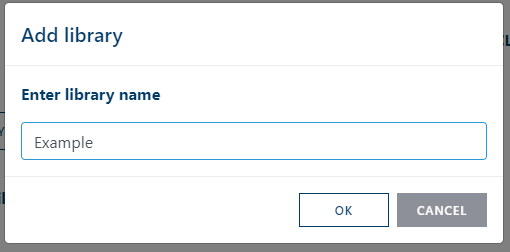
On the top nav bar users can create new Libraries by clicking on Add New Library. When clicked a prompt will appear asking for the name to be given for the new library.
Users can delete libraries by selecting the library they want deleted from the side nav bar and then clicking Delete on the top.
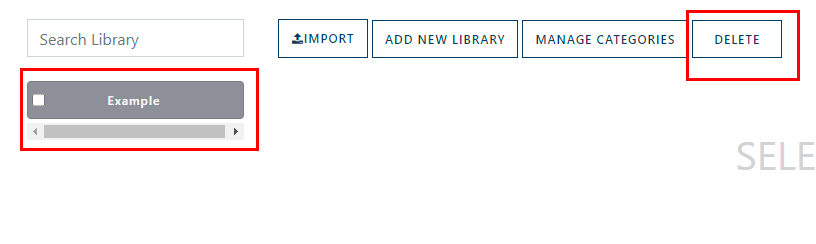
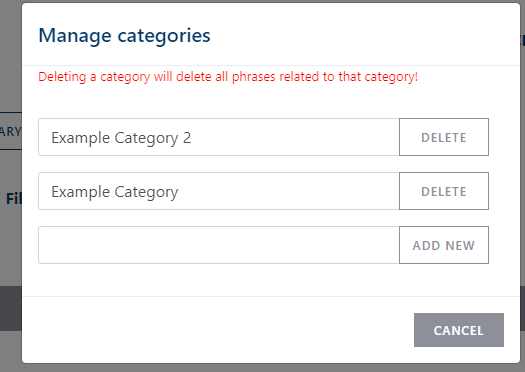
Users can also manage the categories used throughout the library by clicking Manage Categories on top as well. This is useful for helping sort phrases and at least one must be created before phrases can be created.
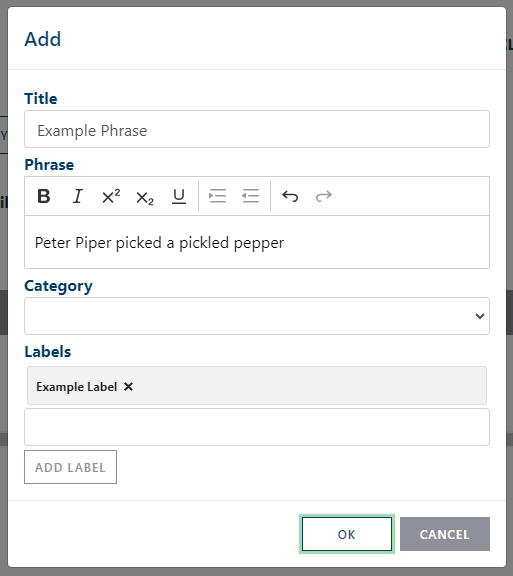
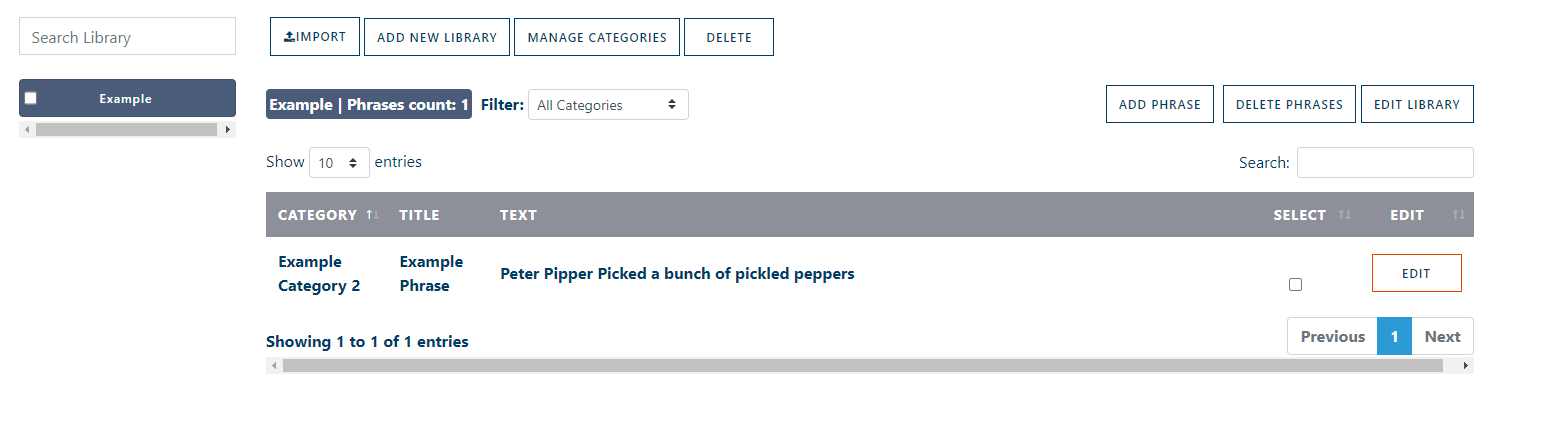
Once a Library is created, you can select it from the left side panel to open up the phrases section. Phrases can be added by clicking on the Add Phrase button on the top right. From there a Phrase title can be assigned, the phrase itself added, a category selected and label(s) attached. Once finished, click Ok to complete.
Phrases can be edited by clicking the Edit button next to it. You can also select one or multiple phrases and delete them by clicking the selection box next to each phrase and then clicking Delete Phrases on the top of the page.
Lastly you can click on Edit Library to edit the Library’s Name to something different if needed.
Update Tool
Under the Acumen tab found in the top ribbon is a button called Updates, this button can be used to update your Acumen Tool set to the latest version available without needing to go to the acumen site and receive the latest version. You can see if there is a newer version available as well via the update icon found in the top right.


When clicked it will show you what version you’re on, the latest version and if you are not up to date an update button will be available from which you can click to start the update process.
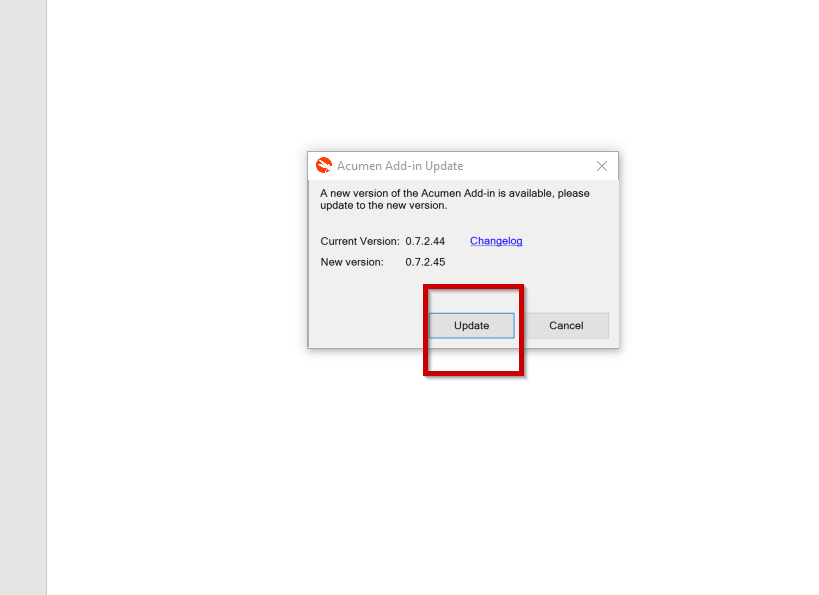
When the button is clicked it will open a installer wizard which you can follow to complete your update. Once done you can click Finish on the bottom of the window and now your tool set should be on the latest version.
Header / Footer Tool
The Header / Footer tool is able to replicate the header and/or footer of a document and apply it to another document or documents inside a folder. When clicked it will prompt the user to select if just the header, footer or both are to be replicated as seen below:

Once that is selected then it’ll prompt the user to select which file or folder they want to apply the changes to.

And once finished the header and/or Footer should match the original doc’s as show in the examples below.
Example Original Doc:

Example doc before applying doc1’s header:

Example Doc after applying doc1’s header:
